Thursday, January 7, 2016

Getting into the Groove of Free Motion

When I found Moda's Hi De Ho fabric, I knew it was the perfect fabric to use for a baby quilt. This was the second quilt that I have completed, and I have to say completing a baby quilt was far easier than the first quilt I tackled. In fact, this quilt is more of a stroller/car seat quilt than a crib quilt. Starting the quilting process with something smaller like this is probably best for the beginning quilter.  

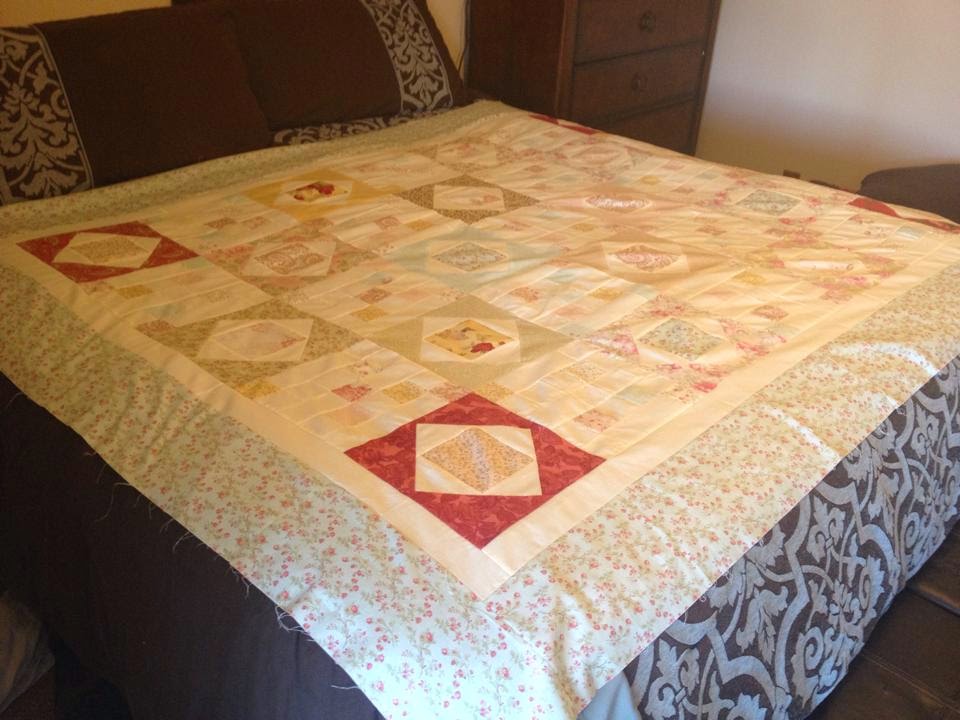
As with all of my current projects, this was a learning experience. Putting the quilt together was relatively easy. As you can see it is comprised of four nine patch blocks with borders. 


My little man Jack is always involved with every step of the quilting process. 

I have refused to have someone else quilt my projects. It just seems like cheating to me. I will be honest, this is the most challenging part of the process, and I fear it will be awhile before I am truly comfortable with the quilting part. For this quilt I decided to jump right in and try free motion quilting. Needless to say that was a true challenge. I basically just did little loops. It was a relatively easy design, but I can see that it will take a great deal of practice to perfect the process. 

I loved the way this quilt turned out. It isn't perfect, but it has character. If I could change one thing, I would probably change the thread I used to quilt it. I used a light yellow (Aurifil thread, of course), but it was so light that I think white might have been better. I think next time I have white borders, I will likely use white thread. 

Now I just need to begin quilting my third project. The top is ready to go. I just need to pin baste the quilt together. More on that project to come...

Tuesday, April 28, 2015

Finally, Quilting

Quilting is an integral part of my heritage. My grandmother was a quilter, and it is something I have always wanted to pursue. My mom once commented that I had great hand stitching skills like my grandmother, and I was wasting my talent. I can acknowledge that I can make some fairly tiny, accurate stitches by hand when I want to do so. The one thing I could not do was use a sewing machine, and the thought of stitching an entire quilt by hand was daunting. But finally, I decided to tackle the sewing machine and go for it. 

I have embraced the sewing machine, and I finally decided I am invested enough in quilting that I could buy a sewing machine instead of borrowing my mom's machine. To be honest, I cannot believe I waited this long. I have not finished an entire quilt, but I have two tops almost done. 

This is my first quilt top. It isn't perfect, but I learned a great deal from the experience. 


I ended up taking out a few blocks and rearranging at my mom's suggestion. She was right, it looked much better after I changed them out. Putting them back in, now that was the challenge. Don't look too closely at the back! To be honest, I initially refused to move them, but given that I planned to give my mom this quilt (which she did not know at the time) I felt obligated. 

This quilt top was actually complete, but it ended up being much larger than expected. I initially thought it would be more of a throw. After taking it to mom's house and placing it on her guest bed, it was almost large enough to cover it. So I will be adding to the borders to make it a little larger. Of course, then I have to quilt it. 

So many have encouraged me just to pay a long-arm quilter to do that part, but I really want to tackle it myself. I haven't had a class on that part, so that may wait until after a class I am taking in June at a local quilt shop. Have to admit that is the most intimidating part to come. I am up to the challenge, and I cannot wait until I have a completed project!

Sunday, January 18, 2015

The Stockings were Hung.....

The Christmas I was seven I got a very special gift from my mom, a felt stocking that I have now had for 32 years! Who knew that this stocking would impact a tradition important for my own family.

Over the years, I have made quite a few felt stockings. The only one pictured below that I did not make is my own. This year I made more stockings in one year than ever before. Starting in September I made one a month for a total of three. Cocoa's was first, then one for my mom (not pictured), and then the one for Jack.


All of our furry babies, past and present, are represented with the stockings. Even though I have made several of these over the last few years, I learned some lessons this year. First, even though the directions for Cocoa's stocking indicated to only use two strands of thread for personalization, I feel like three or four strands would make the name pop more. For future stockings, I will use at least three strands even if the directions call for less. I anticipate that I will redo Cocoa's personalization, because it is one of those things that will nag at me until I fix it.

Jack's stocking also provided for a learning experience. I have made approximately 10 stockings over the years. The kits I have purchased in the past have always had the pieces printed on the felt. So you can imagine my surprise when the first stocking I planned to make for Jack had paper patterns that then had to be cut out of the felt. Not only would this be incredibly time consuming, but it would make the placement of sequins and satin stitching incredibly challenging. So my advice is for anyone planning on making a felt stocking to be sure the kit indicates that the pieces are printed on the felt. Needless to say, I decided to find a different stocking for Jack. To be honest, it worked out for the best, because I like this one much better.

One of my favorite places to find stockings now is at Merry Stockings. They have lots of great stockings available, and the delivery turnaround is excellent. 

Sunday, January 4, 2015

Go Glitter!

I have been eyeing these glitter ornaments on Pinterest for a couple of years. I planned to make them as Christmas gifts last year, but it just did not happen. This year, however, I was determined. The glass ornaments were purchased at Michael's. The various glitter colors that I used were purchased at Joann.

I read several other blog posts before I tackled this project. Following this, I went on the search for clear floor wax that could be used to glitter the inside of the ornaments. I have to tell you I probably agonized over which floor wax to purchase more than anything else. This seems crazy, but I wanted to make sure the glitter would stick. I usually hate glitter ornaments because they tend to leave glitter everywhere. This way the mess is only in the beginning. One key lesson here is to be sure that the wax covers the inside of the entire ornament adequately. There is no going back once you have applied the glitter.

I gave out these ornaments with names on them to many of my friends this year.


I went through quite a bit of my ribbon supply as well. I found that the wider ribbon was much more difficult to tie on the ornament. However, it seemed to stand out more. However, I could tie a nicer ribbon with the smaller size. The Cricut cartridge Cursive 101 was used to create the lettering. The vinyl I used came from a variety of places. The cheapest I found came from Joann Fabrics. It was less than $6 a roll on sale. I was very excited with this discovery. Since these include a $5 coupon for Cricut digital images, I think I got a great deal.  

In addition to making these ornaments, I also made some special ornaments with pet names. I used the same font cartridge, but I also used a paw print (for dog ornaments) and a cat silhouette. The paw print was composed of a couple of different images, because I did not like any of the Cricut paw print images that I had. 


Layering the vinyl on these ornaments was easier than I expected. One issue that I had though was bubbles along the edges of the cat and paw print cut outs. I am not sure this is avoidable, but I do plan on doing some experimenting to see if I can get the images to lay flat on the ornament. Next time around I plan on cutting the edges of the vinyl sheet to see if I can bend it more to the shape of the ornament. We will see if that works. If it does, I guess I will issue a recall for those who received one of these. :)

Sunday, November 23, 2014

Christmas Scraps

I always have good intentions with Christmas cards. In fact this year I have been pinning Christmas card ideas like crazy. I had every intention of making really elaborate cards this year. Obviously, that fell through. I have such a full container of scrap paper that I just wanted to use some of the leftover paper scraps I had there. I was actually able to make 32 cards using predominantly scraps. I did have to cut the base of the card using brown paper, but all the rest could be found in that overflowing drawer.

I rarely use stamps on cards. I feel like I just do not know how to make the most of them, but I do think these turned out nicely.


The cards are A2 in size. I used the brown paper as the card base and the background for the stamps. On some of the cards I added red bling for a Rudolph effect. I could not decide if I liked the cards better with or without the red nose, so I included it on only about half of the cards. I also used ribbon on the cards. I have an abundance of ribbon that I never use, and I really wanted to incorporate that on the cards as well. I was able to use about three rolls of ribbon to make these cards thus opening up space on my ribbon dispenser for one of those many rolls that reside in my closet.

I really think that my resolution for the New Year needs to be to use the plethora of supplies that I already have. I have been trying to break myself from buying whatever paper, stamp, etc. that I see on sale. It is getting easier, but wait, what is that I see? Christmas paper on sale. I really have to have it. Wow, this might not be easy.

Saturday, March 8, 2014

Sunburst Cards

Tried a new card technique recently -- sunburst cards. They process looks more complicated than it really is. I used the following video to learn the process.


Putting the cards together was pretty easy once I got the hang of it. One of the biggest problems I had was with my paper cutter. It just is not cutting very straight, and seems to be worse since I replaced the blade. Might be time for a new cutter, and this was obvious while putting together these cards.

I had a pack of 6x6 paper in coordinating colors, so it was easy to pick matching papers. After putting the cards together, I just stamped them on the front with the greeting.


I really like the way these cards turned out. It could be a great way to use scraps in the future. 


Saturday, February 1, 2014

Baby, Baby

I recently attended a baby shower for a good friend of mine. They don't know the gender of the baby, so gender neutral colors were in order. If you have ever looked for shower decorations in greens and yellows, it is harder than you think. Anyway, I decided to tackle two new projects. I created my first banner and bouquet for the shower.


I tried taking a picture of the banner hanging, but the light from the window made it impossible to see. 


The background shapes for the banner were created using Accent Essentials and the letters are from George and Basic Shapes. I used a brown marker to make the dots around the edges of the shapes, and everything is tied together using a sheer yellow and light green ribbon. I used grommets for the outside center portion to run brown ribbon through to hang the banner. An important lesson emerged from this experience..... Do not, let me repeat, do not run the ribbon for hanging the banner through the center. This makes it very difficult to get the sections to hang correctly. I would definitely run the ribbon through the top next time. I added stickers that I purchased at Michael's to embellish the banner.


The bouquet was much more challenging. I did not use my Cricut on this project. I used stickers that I already had and cut paper to match the size. I also added ribbon for embellishment. Since this my first time creating a bouquet, I tried to keep it simple. I purchased the bucket at Wal-Mart for $1 and inside I placed floral foam. I attached each piece with tape to a skewer and arranged.

You will notice there are also sugar cookies I made to match. Don't look too closely. Eventually, I will make an icing that does not run. Sigh....