Tuesday, April 28, 2015

Finally, Quilting

Quilting is an integral part of my heritage. My grandmother was a quilter, and it is something I have always wanted to pursue. My mom once commented that I had great hand stitching skills like my grandmother, and I was wasting my talent. I can acknowledge that I can make some fairly tiny, accurate stitches by hand when I want to do so. The one thing I could not do was use a sewing machine, and the thought of stitching an entire quilt by hand was daunting. But finally, I decided to tackle the sewing machine and go for it. 

I have embraced the sewing machine, and I finally decided I am invested enough in quilting that I could buy a sewing machine instead of borrowing my mom's machine. To be honest, I cannot believe I waited this long. I have not finished an entire quilt, but I have two tops almost done. 

This is my first quilt top. It isn't perfect, but I learned a great deal from the experience. 


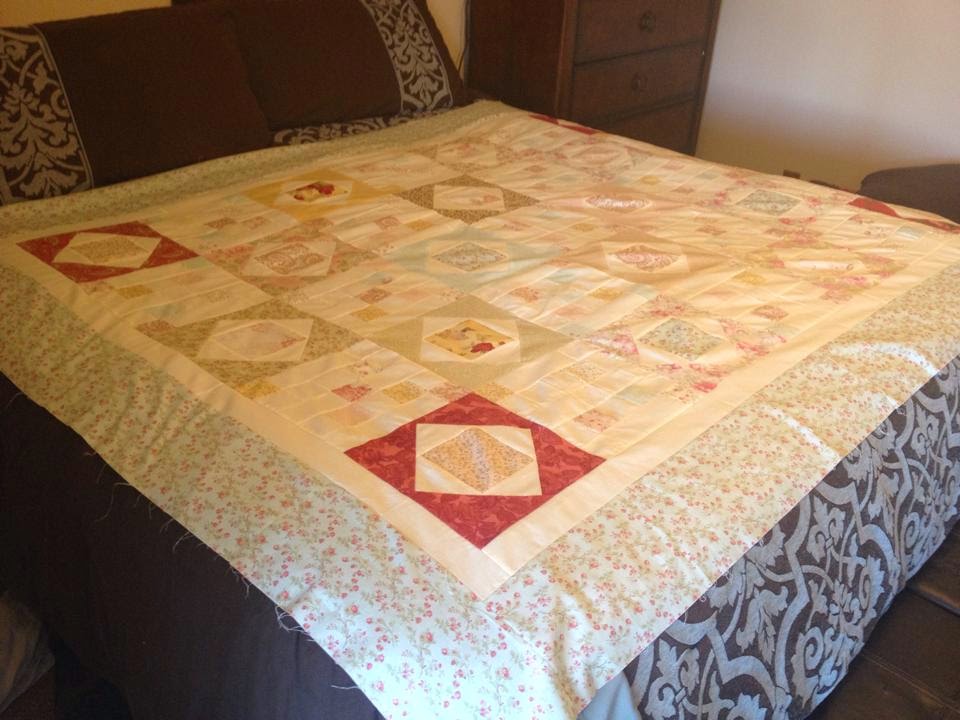
I ended up taking out a few blocks and rearranging at my mom's suggestion. She was right, it looked much better after I changed them out. Putting them back in, now that was the challenge. Don't look too closely at the back! To be honest, I initially refused to move them, but given that I planned to give my mom this quilt (which she did not know at the time) I felt obligated. 

This quilt top was actually complete, but it ended up being much larger than expected. I initially thought it would be more of a throw. After taking it to mom's house and placing it on her guest bed, it was almost large enough to cover it. So I will be adding to the borders to make it a little larger. Of course, then I have to quilt it. 

So many have encouraged me just to pay a long-arm quilter to do that part, but I really want to tackle it myself. I haven't had a class on that part, so that may wait until after a class I am taking in June at a local quilt shop. Have to admit that is the most intimidating part to come. I am up to the challenge, and I cannot wait until I have a completed project!

Sunday, January 18, 2015

The Stockings were Hung.....

The Christmas I was seven I got a very special gift from my mom, a felt stocking that I have now had for 32 years! Who knew that this stocking would impact a tradition important for my own family.

Over the years, I have made quite a few felt stockings. The only one pictured below that I did not make is my own. This year I made more stockings in one year than ever before. Starting in September I made one a month for a total of three. Cocoa's was first, then one for my mom (not pictured), and then the one for Jack.


All of our furry babies, past and present, are represented with the stockings. Even though I have made several of these over the last few years, I learned some lessons this year. First, even though the directions for Cocoa's stocking indicated to only use two strands of thread for personalization, I feel like three or four strands would make the name pop more. For future stockings, I will use at least three strands even if the directions call for less. I anticipate that I will redo Cocoa's personalization, because it is one of those things that will nag at me until I fix it.

Jack's stocking also provided for a learning experience. I have made approximately 10 stockings over the years. The kits I have purchased in the past have always had the pieces printed on the felt. So you can imagine my surprise when the first stocking I planned to make for Jack had paper patterns that then had to be cut out of the felt. Not only would this be incredibly time consuming, but it would make the placement of sequins and satin stitching incredibly challenging. So my advice is for anyone planning on making a felt stocking to be sure the kit indicates that the pieces are printed on the felt. Needless to say, I decided to find a different stocking for Jack. To be honest, it worked out for the best, because I like this one much better.

One of my favorite places to find stockings now is at Merry Stockings. They have lots of great stockings available, and the delivery turnaround is excellent. 

Sunday, January 4, 2015

Go Glitter!

I have been eyeing these glitter ornaments on Pinterest for a couple of years. I planned to make them as Christmas gifts last year, but it just did not happen. This year, however, I was determined. The glass ornaments were purchased at Michael's. The various glitter colors that I used were purchased at Joann.

I read several other blog posts before I tackled this project. Following this, I went on the search for clear floor wax that could be used to glitter the inside of the ornaments. I have to tell you I probably agonized over which floor wax to purchase more than anything else. This seems crazy, but I wanted to make sure the glitter would stick. I usually hate glitter ornaments because they tend to leave glitter everywhere. This way the mess is only in the beginning. One key lesson here is to be sure that the wax covers the inside of the entire ornament adequately. There is no going back once you have applied the glitter.

I gave out these ornaments with names on them to many of my friends this year.


I went through quite a bit of my ribbon supply as well. I found that the wider ribbon was much more difficult to tie on the ornament. However, it seemed to stand out more. However, I could tie a nicer ribbon with the smaller size. The Cricut cartridge Cursive 101 was used to create the lettering. The vinyl I used came from a variety of places. The cheapest I found came from Joann Fabrics. It was less than $6 a roll on sale. I was very excited with this discovery. Since these include a $5 coupon for Cricut digital images, I think I got a great deal.  

In addition to making these ornaments, I also made some special ornaments with pet names. I used the same font cartridge, but I also used a paw print (for dog ornaments) and a cat silhouette. The paw print was composed of a couple of different images, because I did not like any of the Cricut paw print images that I had. 


Layering the vinyl on these ornaments was easier than I expected. One issue that I had though was bubbles along the edges of the cat and paw print cut outs. I am not sure this is avoidable, but I do plan on doing some experimenting to see if I can get the images to lay flat on the ornament. Next time around I plan on cutting the edges of the vinyl sheet to see if I can bend it more to the shape of the ornament. We will see if that works. If it does, I guess I will issue a recall for those who received one of these. :)